Wednesday, July 28, 2010

Swimming in Wrapping Paper


June was filled with birthday party planning. Ella turned 8 and Lauren made the big 1!!!! My babies are growing!

I have tried writing this a few times, and I can never come up with the right words.  I never have been a writer.  So I'll let the pictures do the talking.

Ella's party:
Her Banner I made using scrapbook paper, cardstock, cardboard letters from the scrapbook section for stencils and an exacto knife.


The cake:
I cheated and bought from Publix.  But I did add the pretty "E"....Am I not the best "E" cake writer ever?  Ha!

I made these fa-boose tutus for the girls


And Lauren's hat (sorry this picture is blurry, but chubby, naked baby is too cute to not share:
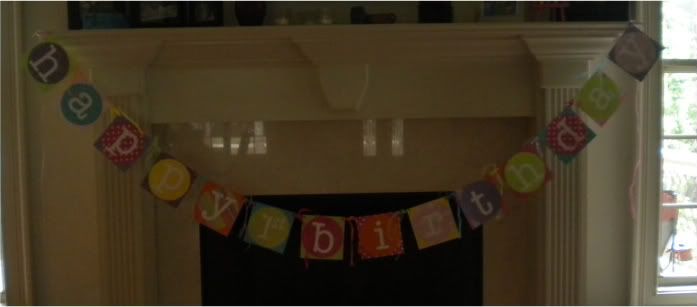


Lauren's Party:
I can't believe my baby is 1!!!!!!  

Her banner:
 
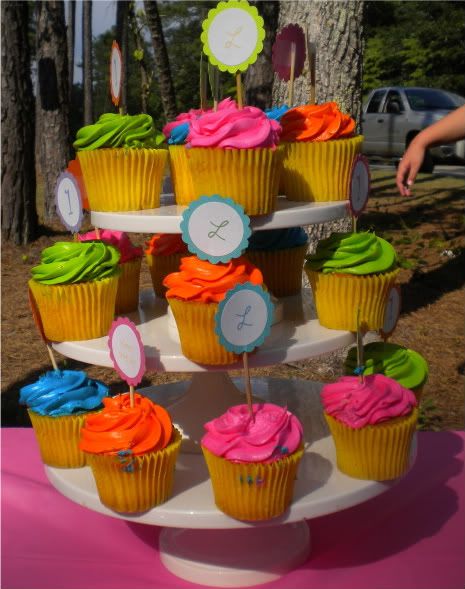
The cupcake toppers made with 1 7/16" circle punch and 1 7/8" scalloped edge circle punch.  I used card stock for the back and I printed "1", "Happy Birthday", and "L" on just regular paper.  Though, next time I will probably just use card stock.  That was my intentions, but I got lazy and didn't feel like walking upstairs to the printer and loading it.  I know, I know...that's pathetic!
 And I couldn't find long picks long enough for cupcakes.  I'm sure someone more professional would know better where to find them.  I used bamboo skewers I had laying around the house and cut them to the length I needed.  PERFECT!!!!


I also made these yummy chocolate covered marshmallows with sprinkles.  Melt chocolate chips (I used the kind you get from craft stores that look like little discs).  Insert a lollipop stick into the marshmallow and dip into melted chocolate and then keep twisting to get the extra out (if you have patience, which I do not).  Then sprinkle with sprinkles.  Insert into a styrofoam cone (I sprayed painted mine bright pink).  If you have the space, it's best to refrigerate.  Ok, that's how you do it to make it easy.  As you can see from the picture below, I did not do this.  I lack patience.  So, I dipped them in chocolate and put sprinkles.  After, I put it on a baking sheet lined with wax paper and put in the fridge.  They don't turn out as pretty though.
And finally, her outfit:


Her hat:

The hat I made from a package of hats that I got from Target for $1.  I covered the hat with scrapbook paper (first undo the hat and use it as a pattern to cut the scrapbook paper).  I just stapled it to the hat (remember, lazy).  For the frill....I used some left over tulle (from 6" tulle ribbon) and cut it in a 3" wide strip.  Unfortunately, I don't know how long it was.  I just made it really long to make sure I had enough.  I used my favorite ruffling technique (using the highest thread tension setting on my sewing machine with the longest straight stitch).  I just stapled that down to the hat.  I used card stock to do the "1".  Hint:  I just printed off "1" on my computer in the mirror image from the "Curlz" font.  (Does that last sentence make sense?)  Now, that I actually took time to glue down.  The ribbon for the ties, I again just stapled.  Voila...done!

The smash cake was a disaster.  A week before this party, she had an allergic reaction to eggs which resulted to a trip to the ER.  I was going to get Publix to make her a small plain cake that I was going to dress up, but their icing it made with egg whites (BOO).  And everyone uses eggs.  So I had to make my own, and well, to say it was ugly, would be a compliment.  

Friday, April 23, 2010

Pettiskirt....err...Pettinightmare

Photobucket
This is what took me 5 days to make. I read somewhere online that a lady said it took her 4 hours. I guess if I had a ruffler foot, it might take me 4 hours, but from where I sit, I think that lady is nutso! HA!

So this is what you'll need/I used:
5 yards of 108" nylon chiffon (the 108", I got from Fabric.com)
1 yard of silk charmuese
2 yards of fusing
2 spools of thread (I have never used 1 entire spool of thread....until this project and I went through 1-1/2)
3/4" elastic for waist

Made my life easier:
rotary cutter
Quilting Slot Ruler
Photobucket

1) Cut all your pieces of fabric.
A)The top tier is the satin charmuese. For this, you need to measure the waist...then double it. That's the width. I did the length at 10-1/2". This will be the drop waist. It will be folded over in half. You may elect to go shorter or longer. Bottom line, cut a piece of fabric that is (waist * 2) x (your desired drop length + 1/4 seam allowance) * 2).***The silk charmeuse frays extremely bad, iron a strip of 2" interfacing to the inside of the silk to prevent fraying (follow instructions on the packaging****
B)You will need 12 strips of 6-7" x 108" (the width of the fabric). If you're using the rotary cutter and ruler, fold over multiple times and you will cut your time!
C) For the "fluff" (the ruffle at the bottom), cut strips of 2.5"...cut most of the fabric that you have left. I used most of the 5 yards I had.

2) Organize your fabric
Photobucket
It's best to keep everything organize because it's a lot of fabric and easy to get everything mixed up. There are 3 tiers to this skirt (not including the "fluff" at the bottom) and two layers (Inner and Outer). The bottom 2 tiers (labeled top and bottom) are made from the chiffon. This is what you need the 12 strips:
Inner Top- 2 strips
Outer Top- 2 strips
Inner Bottom- 4 strips
Outer Bottom-4strips

3) Sew together end to end the Inner Bottom strips.  Then repeat for the outer bottom strips.   (But do not sew to make a circle).  Just make 2 VERY, VERY, VERY long pieces.

4) Make "fluff".  This is where that 2.5" strips come along.  And it's so much fun.  If you have a ruffler foot, use that.  I don't own one, and I'm not quite sure how to use one, so I didn't want to start this process trying to learn a new process.  I used my machine to gather everything.  I did a straight stitch at the longest stitch setting with the highest tension.  This gathered it quite nicely.

5) Attach fluff to bottom tiers (inner and outer). ***(Remember to adjust the stitch length and tension)*** I orginally attached it all with pins first and then sewed it all together.  But I found on the outer layer, it was easier (and less time consuming) to just sew it without worrying about pining it together.  The layer I did with pins, I had to go through and sew a few spots again, when I didn't pin, I was a little more careful and thus got it all right the first time.
Photobucket

6) Sew together the inner and outer top tiers.  Again, just make to very long strips, not a circle.


7) Gather bottom layers to fit top layer.  For this one, I used just the regular tension setting with the longest straight stitch.  Make sure to keep the threads long and don't overstitch.  You need to reduced the bottom tiers to fit the top.  You may need to gather more or take out some of the gather to fit to the top tier.

8) Sew the bottom layer to the top layer.  Using a standard straight stitch.  Again remember, to put it at a regular stitch length.  Sew the right sides together.
Photobucket

(Again, I learned that pinning isn't a necessity.  It's less time consuming to do without pinning.)


9) Gather top tiers (with the bottom attached) to fit waist.  Follow instructions from Step 7.
Photobucket


10) Attach the chiffon tiers to silk waist.
Photobucket
  It should look like this when finished:
Photobucket

11) Fold the silk charmeuse in half lengthwise.  And sew a 1" casing at the top (Unfortunately, I was impatient at this point and didn't take a picture).

12) Insert the elastic (which is the width of the waist).  

13) Sew it shut.  I got to this point, and I realized a bit of an issue.  You don't want to sew the top and bottom layers together.  So I sewed the waist (the silk charmeuse tier) together.  Then I sewed the top layer of chiffon together and then the bottom separately.


TA DA-
Bottom of the skirt....ruffles galore
Photobucket

Twirl
Photobucket

Photobucket

Notes:
*The lengths of the strips can work for any size (kid size, not baby, through adult sizes).  You can probably reduce if you're making it for a small child (8 and younger). 
* After finishing it, I think I probably could have done the waist width a little smaller (the silk charmeuse strip).  Probably could have done it:  waist * 50% and been fine.  It looks a little too gathered for my taste.
*Also if I were doing it again, I would probably done a 3 or 4" drop waist instead of a 5".    And I did 7" for the tiers, but I probably would have been fine at 6".
* Make sure to use NYLON ChiffonIt doesn't fray.  The polyester kind does...like crazy! 
* I cannot find any nylon chiffon in any retailers.  I ordered mine from Fabric.com. They have the 108". You can find 54" at various online fabric stores. Just double the amount of strips you'll need.

Please send me a note if you have any questions.  I'm always glad to help.
Don't know if I'll be making this again any time soon, but I did love the outcome!!! 

Wednesday, March 31, 2010

It's been a long time

I've been busy, AKA lazy! I have a few projects that I have worked on. This is a dress I made for a cousin's little girl...
Photobucket
Unfortunately, it's too small, so I have to make another one. I'm starting to see a pattern in my sizing issues. Blah! Maybe one day in my re-making of things, I'll actually stop to take pictures! Hmm...maybe!

Tomorrow, I start on my newest project, a pettiskirt for someone's daughter. My first time, and I must confess, I'm a little overwhelmed. I got my fabric in the mail today! YAY! (You need nylon chiffon, and there is no retailers that I can find that carry it, so it must be ordered).

Anyway, I'm using these instructions (3rd reply down).

I'll make sure to take pictures and give you my instructions (since I'm doing it from the bottom up) and any tips I find might be useful. Oh yeah, didn't mention, I don't have a ruffler foot!!! HA! Should be much fun!

Find me in the looney bin on Sunday!

Happy Easter everyone!


Sunday, March 7, 2010

Finished, Maybe?

Here's the final result:
Photobucket

Not sure how much I really like it. Maybe it's just a little too blue? I don't know.

Also, we're not sure if we should paint the center of the tray or whatever it's called over the breakfast area (the part where the light is hanging?)
Photobucket
(and ok, well, in this picture you can see I lied...we're not completely finished)

to match the dining room (they both have bead board)
Photobucket

I should say, my husband doesn't think so, and I think so. So if anyone stumbles across this...give me your opinions! :)

ta-ta for now!

Saturday, March 6, 2010

While waiting

This little headband took about 10 minutes to make. I cut 3 strips that were 1"-1-1/2" wide and about 24" long...and then this again to have 2 braided strands. I had a stretchy headband (the kind you wear to go to the gym) and I cut about a 3 inch piece to finish it...sewed it all together. Now, if my hair wasn't all pulled back (and if it wasn't such a pain to get my hair right in it) I'd take pictures of it finished off of my head.

Photobucket

House projects

Remember when I said we had a bunch of unfinished projects around our house? Well, instead of finishing those, we've decided to start new ones.

Our house is in desperate need of color. We saw a picture of a friend's house that was similar in style and had ice blue walls. It looked great. And their cabinets were close to the same finish as ours.

This was the result:
Photobucket

See the color samples on the wall in this one?
Photobucket

So we really didn't like this color! The hubs is at Home Depot getting more paint. I can't take the ice blue for one more minute! He's also getting a dark chocolate for this wall:
Photobucket

And eventually, the rest of the walls in the living room will be a few shades lighter (we have to hire someone for those...someone with scaffolding).

Our house is in some serious need of color. And some decor!!!! Eventually, I'll get to curtains. We just got a rug last week. Slowly but surely, we're making this house a home!

Stay tune with final results!

PS...I need some decor help with this mantel. I HATE that we have our tv up there, but it's the only place in the living room for it. Someone please send me some ideas...pictures...ANYTHING!


Thursday, March 4, 2010

Refashioned onesie

Photobucket
(Unfortunately, my husband stole my camera, so I don't have any pictures from along the way...sorry, maybe I'll (no maybe, I WILL) make another and take pictures along the way).

I, personally, don't like onesie on my daughter. Her little belly can't fit all her guts, so it sticks out and just looks quite funky on her.

I had this extra fabric lying around from another project (that I should post), and I just LOVE it...I had to come up with some excuse to use it.

I cut the bottom off a onesie (about 2 inches from the arms). You can elect to keep the bottom on. I used the longest straight stitch on the highest tension setting on my machine to gather the material. Sewed them together, and Poof, a new dress!!! :)

Oh, and I added the little flower for some detail. Did the same gathering technique and just rolled up the material and hand sewed it to the dress. (Ok, is "hand sewed it" proper English? It doesn't sound like it! Help a Southerner out! hehe)